
dewalt table saw dw745 manual
Dewalt DW745 Table Saw Manual: A Comprehensive Guide
This manual provides detailed instructions for the Dewalt DW745, covering safety, setup, operation, maintenance, and troubleshooting, alongside parts diagrams and warranty details․
The Dewalt DW745 is a portable table saw renowned for its balance of power and precision, making it a favorite among both hobbyists and professionals․ This 10-inch table saw delivers robust performance for a variety of cutting tasks, from simple rip cuts to more complex bevels and miters․ Its compact design enhances portability, allowing for easy transport to job sites or around the workshop․
This manual serves as a comprehensive resource, guiding users through every aspect of the DW745’s operation and maintenance․ Understanding its features and adhering to safety guidelines will ensure optimal performance and longevity․
Safety Precautions and Warnings
Operating a table saw involves inherent risks; prioritizing safety is paramount․ Always wear approved safety glasses and hearing protection․ Keep hands clear of the blade, and never reach over or around a moving blade․ Utilize the blade guard and anti-kickback device at all times unless performing a specific operation requiring their removal․
Disconnect the power cord before making adjustments or changing blades․ Be mindful of kickback, a dangerous reaction that can occur during cutting․ Maintain a clean and well-lit workspace, free from obstructions․
Unboxing and Initial Setup
Carefully unpack the Dewalt DW745, verifying all components are present using the parts list․ Inspect for any shipping damage․ Assemble the table and frame, ensuring all bolts are securely tightened․ Attach the legs, ensuring stability on a level surface․
Install the blade guard and anti-kickback device․ Connect the dust collection port to a vacuum or dust collector․ Before first use, inspect the power cord for damage and confirm proper grounding․
Component Identification
The Dewalt DW745 consists of a robust table and frame providing a stable work surface․ A powerful motor drives the blade, crucial for various cuts․ The rip fence ensures accurate parallel cuts, while the miter gauge facilitates precise angled crosscuts․
Key components include the blade guard for safety, and the anti-kickback device preventing workpiece rebound․ Familiarize yourself with the power switch, height adjustment wheel, and bevel adjustment mechanism for optimal control․
Table and Frame Assembly
Begin by attaching the legs to the table frame using the provided bolts and washers, ensuring a secure fit․ Verify the frame is square before fully tightening․ Next, carefully position the tabletop onto the assembled frame, aligning the mounting points․
Secure the tabletop with the designated hardware, confirming it’s flush and stable․ Double-check all connections for tightness to prevent wobbling during operation․ A properly assembled table and frame are fundamental for accurate and safe cutting․
Motor and Blade Details
The DW745 features a 15-amp motor delivering ample power for various cutting tasks․ It’s crucial to understand the blade’s specifications – diameter, arbor size, and tooth count – for optimal performance․ Regularly inspect the motor for any unusual noises or vibrations, indicating potential issues․
Ensure the blade is correctly mounted and tightened before each use․ Proper blade selection impacts cut quality and safety; choose blades suited to the material being cut․ Always disconnect power before performing any motor or blade maintenance․
Fence and Miter Gauge Overview
The DW745’s rip fence ensures accurate and repeatable rip cuts, crucial for consistent project dimensions․ Proper alignment is key; always verify its parallelism with the blade before operation․ The miter gauge facilitates precise crosscuts and angled cuts, utilizing a smooth gliding action․
Inspect both the fence and miter gauge for damage before each use․ Securely lock the fence in place and ensure the miter gauge slides freely within its track․ Understanding their functions is vital for safe and accurate cutting․
Understanding the Control System
The DW745’s control system is designed for intuitive operation and precise adjustments․ The prominent power switch allows for easy on/off functionality, with a safety lock to prevent accidental starts․ Height and bevel adjustments are conveniently located, enabling quick blade angle changes for various cutting applications․
Rip fence adjustments are straightforward, ensuring accurate material width control․ Familiarize yourself with each control before operation, prioritizing safety and understanding the impact of each adjustment on the final cut․
Power Switch and Operation
The Dewalt DW745 features a robust power switch, designed with user safety as a primary concern․ Before operation, ensure the switch is in the “off” position․ To start, depress the safety lock and then firmly press the power switch․ Release the safety lock immediately after starting to prevent accidental activation․
Always allow the blade to reach full speed before commencing any cut․ Never force the switch; if it doesn’t engage smoothly, investigate the issue before proceeding․
Height and Bevel Adjustment

Adjusting blade height and bevel on the DW745 is crucial for diverse cuts․ The handwheel controls blade height, offering precise adjustments for varying material thicknesses․ Rotate clockwise to raise, counterclockwise to lower․ For bevel cuts, unlock the bevel lock lever, adjust the blade angle using the bevel scale, and securely re-lock the lever․
Always ensure the locks are firmly engaged before operating the saw․ Regularly check for smooth operation and tighten any loose components․
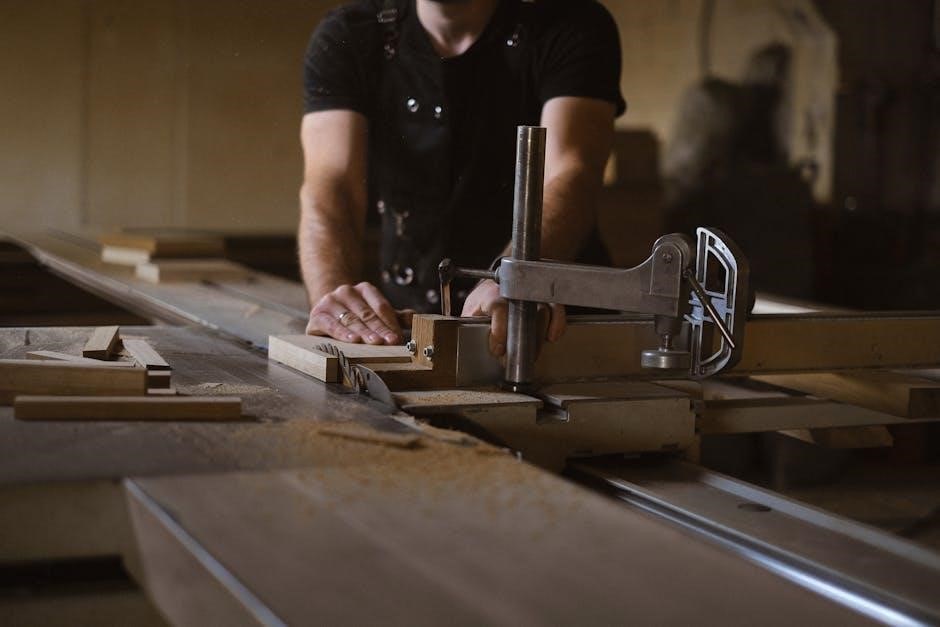
Rip Fence Adjustment
The DW745 rip fence ensures accurate parallel cuts․ Loosen the fence lock knob to slide the fence along the rails, positioning it for the desired cut width․ Utilize the measuring scale for precise adjustments, ensuring it’s parallel to the blade․ Once positioned, firmly tighten the lock knob to secure the fence․
Regularly inspect the fence rails for debris and maintain cleanliness for smooth operation․ A properly adjusted rip fence is vital for consistent, professional results․
Blade Selection and Installation
Choosing the correct blade is crucial for optimal performance․ Consider the material being cut – hardwood, softwood, or non-ferrous metals require specific blade tooth counts and designs․ Always use blades rated for the DW745’s maximum RPM․
For installation, disconnect power! Use the provided wrench to loosen the arbor nut, remove the old blade, install the new one (ensuring correct rotation), and tighten the nut securely․ Always verify blade stability before operation․
Choosing the Right Blade
Selecting the appropriate blade significantly impacts cut quality and safety․ For ripping lumber, a blade with fewer teeth (24-30) is ideal, providing faster cuts․ Crosscutting requires more teeth (40-60) for cleaner, chip-free results․
Consider the material: High tooth count blades excel with plywood and melamine․ Carbide-tipped blades are essential for durability․ Ensure the blade’s arbor size matches the DW745’s (5/8 inch) and its maximum RPM exceeds the saw’s speed․
Blade Changing Procedure
Always disconnect the power cord before changing the blade! Use the provided wrench to loosen the arbor nut․ Secure the blade with the blade lock, then carefully remove the old blade․
Mount the new blade ensuring correct rotation direction (teeth pointing towards the operator)․ Tighten the arbor nut securely, then release the blade lock․ Verify the blade guard functions correctly before reconnecting power and testing operation․
Blade Guard and Anti-Kickback Device
The blade guard is crucial for operator safety, minimizing contact with the rotating blade․ Ensure it’s properly installed and functioning before each use․ The anti-kickback device prevents workpiece from being thrown back towards the operator during a bind․
Regularly inspect both components for damage or wear․ Never disable or bypass these safety features; they are designed to protect you from serious injury․ Proper adjustment is key for optimal performance․
Basic Cutting Operations
Mastering fundamental cuts is essential for safe and accurate woodworking․ This section details rip cuts, utilizing the rip fence for consistent width, and crosscuts, employing the miter gauge for precise angles․
Bevel cuts allow angled slices, expanding project possibilities․ Always ensure proper blade height and fence alignment before initiating any cut․ Prioritize safety by using push sticks and maintaining firm control of the workpiece throughout the cutting process․
Rip Cuts: A Step-by-Step Guide
Achieving accurate rip cuts requires careful setup․ First, lock the rip fence at the desired width, ensuring it’s parallel to the blade․ Securely position the workpiece against the fence, leaving space between the blade and your hand․
Power on the saw and feed the material smoothly, maintaining consistent pressure․ Utilize a push stick for the final portion of the cut, prioritizing safety and preventing kickback․ Repeat for multiple pieces, verifying each measurement․
Crosscuts with the Miter Gauge
For precise crosscuts, engage the miter gauge, sliding it along the table’s t-slot․ Ensure the blade is at the desired angle, locking it securely․ Position the workpiece firmly against the miter gauge, maintaining consistent contact throughout the cut․
Slowly feed the material through the blade, avoiding any sudden movements or excessive force․ Utilize a backer board for support, especially when cutting narrower pieces, enhancing accuracy and safety․
Bevel Cuts and Applications
Achieve angled cuts by tilting the blade using the bevel adjustment handle․ Loosen the handle, set the desired angle on the scale, and retighten securely․ Bevel cuts are ideal for creating decorative edges, joining pieces at angles, or crafting projects requiring non-90-degree intersections․
Always test the bevel angle on scrap material before cutting your final piece․ Ensure the workpiece is firmly supported and fed smoothly through the blade for clean, accurate bevels․
Advanced Cutting Techniques
Expand your capabilities beyond basic cuts with specialized techniques․ Dado cuts, utilizing dado blade sets, create wide grooves for joinery․ Tenoning involves precise rip and crosscuts to form tenon and mortise joints․ Mastering these enhances project complexity․
Cutting curves and angles requires careful planning and potentially auxiliary tools․ Utilize jigs or freehand techniques with caution, prioritizing safety and control․ Practice on scrap wood before attempting final cuts․
Dado Cuts and Using Dado Blades
Dado cuts create grooves for shelves, joinery, and decorative elements․ Employ a dado blade set – a stacked blade configuration – for varying groove widths․ Always use the blade guard and anti-kickback device․ Multiple passes may be needed for wider cuts, reducing strain on the motor․
Adjust blade height incrementally, ensuring stability․ Test-cut on scrap wood to verify width and depth before cutting your workpiece․ Proper feed rate prevents tear-out and ensures clean, accurate dadoes․
Tenoning Techniques
Creating tenons – projecting tongues – for strong joinery requires precision․ Utilize a tenoning jig for consistent, repeatable cuts․ Begin by establishing the tenon shoulder, then carefully adjust the fence for cheek cuts․ Always prioritize safety with blade guards and push sticks․
Multiple passes are crucial, gradually increasing blade height to achieve the desired tenon size․ Test-fit frequently to ensure a snug, accurate joint․ A well-executed tenon provides exceptional strength and stability․
Cutting Curves and Angles
Achieving curves and angles with the DW745 demands careful technique and appropriate accessories․ For gentle curves, employ a smooth, controlled feed rate, anticipating the blade’s path․ Always use a push stick for safety and control․ For tighter curves, consider a scroll saw or jigsaw․
Angled cuts are best accomplished using the bevel adjustment, ensuring the blade is securely locked at the desired angle․ Practice on scrap wood before committing to the final piece․ Precision is key for seamless angled joinery․
Maintenance and Troubleshooting
Regular maintenance extends the DW745’s lifespan and ensures optimal performance․ Clean sawdust frequently with a brush or vacuum, avoiding compressed air which can damage components․ Lubricate moving parts per the manual’s schedule․ Inspect the belt for wear and replace as needed, ensuring proper tension․
Common issues include blade drift (adjust fence), burning smells (check for binding), and power loss (inspect cord/breaker)․ Always disconnect power before any maintenance or troubleshooting steps․ Refer to the detailed troubleshooting section for specific solutions․
Regular Cleaning and Lubrication
Maintaining a clean DW745 is crucial for accuracy and longevity․ After each use, remove sawdust from the table, blade guard, and internal components using a brush or vacuum․ Avoid compressed air, as it can force dust into sensitive areas․ Lubricate the elevation and bevel gears, as well as the fence rails, with a light machine oil․
Follow the lubrication schedule outlined in the manual․ Periodically check and tighten all bolts and screws․ A clean and well-lubricated saw operates smoothly and safely․
Belt Replacement Instructions
Replacing the DW745’s drive belt requires disconnecting power and accessing the motor compartment․ Remove the motor cover and carefully note the belt routing before disassembly․ Loosen the motor mounting bolts to create slack for belt removal․ Install the new belt, ensuring proper alignment with the pulleys․
Retighten the motor bolts and replace the cover․ Verify belt tension before operation; it should have minimal deflection․ Always use a genuine Dewalt replacement belt for optimal performance and safety․
Common Problems and Solutions
If the DW745 fails to start, check the power cord, switch, and breaker․ For inaccurate cuts, verify fence alignment and blade trueness․ Excessive vibration may indicate a loose blade or motor mounting․ Burning smells often signal a worn belt or overloaded motor – immediately stop and inspect․

If the blade drifts, ensure proper tension and alignment․ Always disconnect power before troubleshooting․ Refer to the parts diagram for component locations and consult Dewalt support if issues persist․
Parts Diagram and Replacement
A detailed exploded view illustrates all DW745 components, aiding identification for repair or replacement․ Key parts include the table, fence, miter gauge, blade, motor, and various hardware․ Locate parts lists online via Dewalt’s website or authorized retailers․
Genuine Dewalt replacement parts ensure optimal performance and safety․ When ordering, specify the model number (DW745) and part number for accurate fulfillment․ Always disconnect power before attempting any repairs or replacements․
Locating Replacement Parts
Finding DW745 replacement parts is straightforward․ Dewalt’s official website offers a comprehensive parts catalog searchable by model number․ Authorized Dewalt service centers can also assist with locating and ordering specific components․ Numerous online retailers specializing in power tool parts stock DW745 spares․
When searching, utilize the part number from the parts diagram for precision․ Verify compatibility before purchasing, and consider genuine Dewalt parts for guaranteed quality and fit․ Always prioritize safety when replacing components․

Understanding the Parts List
The DW745 parts list is a crucial resource for maintenance and repair․ It details every component, assigned a unique part number for easy identification․ Diagrams accompany the list, visually illustrating each part’s location on the saw․
Familiarize yourself with key sections – table, fence, motor, blade guard, and hardware․ The list specifies quantities and often includes exploded views for complex assemblies․ Accurate part numbers are essential when ordering replacements, ensuring proper fit and function․
Warranty Information
Dewalt stands behind the DW745 table saw with a comprehensive warranty, typically covering manufacturing defects for a specified period from the date of purchase․ This warranty generally includes parts and labor, but excludes wear items and damage resulting from misuse or accidents․

To make a claim, retain your proof of purchase and contact Dewalt customer service․ Registration of your saw may expedite the process․ Review the full warranty details in the included documentation for specific terms and conditions․
Frequently Asked Questions (FAQ)
Q: Can the DW745 cut through hardwoods? A: Yes, with the appropriate blade, it handles hardwoods effectively․ Q: How often should I lubricate the saw? A: Regularly, as detailed in the maintenance section․ Q: Where can I find replacement parts? A: Through Dewalt’s website or authorized retailers․
Q: Is the fence truly accurate? A: Proper adjustment is key; refer to the fence adjustment guide․ Q: What blade size does it use? A: A standard 10-inch blade․ Q: What is the dust collection port size? A: Typically 2․5 inches․
Resources and Support

For comprehensive assistance with your Dewalt DW745, visit the official Dewalt website (dewalt․com) for downloadable manuals, safety guidelines, and troubleshooting tips․ Explore dedicated support forums where users share experiences and solutions․
Numerous online tutorials on platforms like YouTube demonstrate various cutting techniques and maintenance procedures․ Dewalt’s customer service team is readily available via phone or email to address specific concerns and provide expert guidance․ Utilize these resources for optimal saw performance․
Dewalt Website and Support Forums
The official Dewalt website (dewalt․com) serves as a primary resource, offering downloadable manuals, parts diagrams, and safety information specifically for the DW745 table saw․ Access frequently asked questions and troubleshooting guides to resolve common issues․
Engage with the Dewalt community through online support forums, where users exchange tips, share experiences, and provide solutions․ These forums are invaluable for gaining insights and addressing unique challenges related to your table saw’s operation and maintenance․
Online Manuals and Tutorials
Numerous online resources supplement the official Dewalt DW745 manual, providing visual aids and step-by-step guidance․ Platforms like YouTube host a wealth of video tutorials demonstrating setup, blade changes, cutting techniques, and safety procedures․

Explore dedicated woodworking websites and forums for in-depth articles and user-created guides tailored to the DW745․ These resources often cover advanced techniques, troubleshooting tips, and modifications to enhance your table saw’s performance and versatility․
Specifications of the DW745
The Dewalt DW745 boasts a 15-amp motor delivering 3,800 RPM․ Its maximum cutting width is 30․5 inches, with a maximum rip capacity of 25 inches to the right and 12 inches to the left of the blade․
The table dimensions are 21․5 x 16․75 inches, and the bevel capacity ranges from 0 to 45 degrees․ It features a 2․5-inch dust collection port for efficient cleanup, weighing in at approximately 48 pounds for portability and ease of maneuverability․