
high five enail user manual pdf
High Five E-Nail User Manual PDF: A Comprehensive Guide
This guide details setup, operation, and maintenance of your High Five E-Nail. It includes safety precautions, troubleshooting, and warranty details for optimal use.
Welcome to the world of precision temperature control with the High Five E-Nail! This device revolutionizes concentrate consumption, offering consistent heating and unparalleled flavor. The included user manual provides essential instructions for safe and effective operation. This guide covers everything from initial setup – connecting the power cord and attaching the heating coil – to advanced troubleshooting.
The High Five E-Nail is CE and UL certified, ensuring grounded and fuse-protected components for user safety.
Understanding E-Nails and Their Benefits

E-Nails, like the High Five, offer a superior alternative to traditional methods for vaporizing concentrates. They provide precise temperature control, eliminating the guesswork and inconsistencies of torches. This results in enhanced flavor profiles and a more efficient extraction process. Benefits include consistent heating, improved concentrate preservation, and a safer user experience, avoiding open flames.
Compared to other brands like Puffco or Galaxy, the High Five prioritizes durability and reliability.
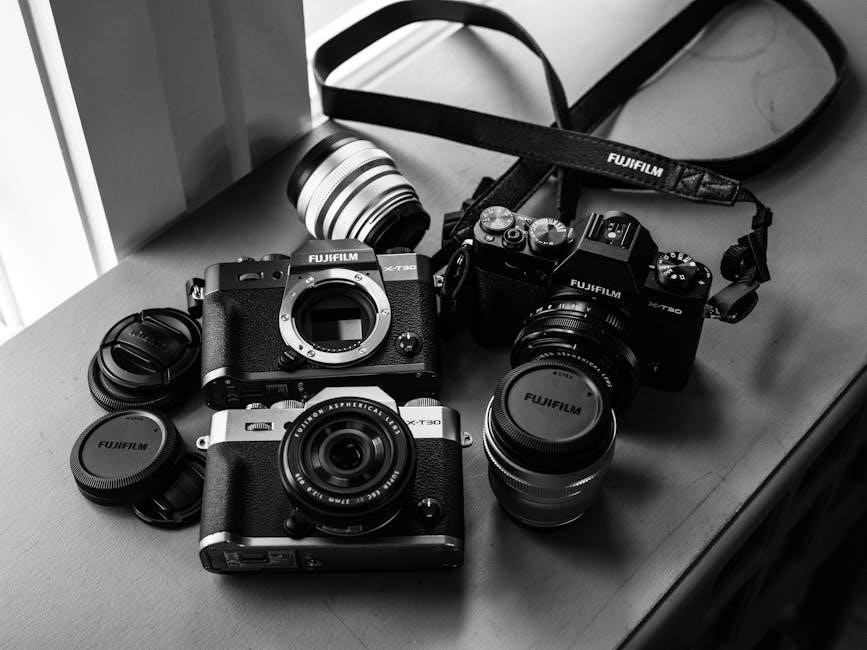
What’s Included in the Box
Your High Five E-Nail kit contains everything needed for immediate use. Included is a detailed User Manual to guide you through setup and operation. A 6ft Power Cord ensures convenient placement. The kit also features an LCD E-Nail Controller for precise temperature adjustments. Furthermore, you’ll find durable and reliable components, all CE & UL certified, grounded, and fuse protected for safety.
Essential accessories like the heating coil and universal joint are also provided.
User Manual Overview

This comprehensive manual provides step-by-step instructions for safely and effectively using your High Five E-Nail. It covers initial setup, including connecting the power cord and attaching the heating coil. Detailed sections explain operating procedures, temperature control, and essential safety precautions to avoid burns and ensure proper ventilation.
Troubleshooting guidance and warranty information are also included, ensuring a positive user experience.
E-Nail Controller Components
The High Five E-Nail controller features a user-friendly LCD display for precise temperature adjustments. Key components include power buttons, temperature control buttons, and display indicators showing current settings. It’s designed for durability and reliable performance. The controller connects to the heating coil via a specialized adapter, ensuring efficient heat transfer.
A 6ft power cord is included for convenient placement and operation.
Power Cord Specifications
The High Five E-Nail utilizes a standard 6ft power cord, designed for reliable and safe operation. It’s constructed with durable materials to withstand regular use and prevent damage. The cord is compatible with standard electrical outlets, ensuring easy setup.
This cord is grounded and fuse protected, adhering to CE and UL certification standards for enhanced safety. Always inspect the cord for any signs of wear or damage before each use.
Safety Precautions
Prioritize safety when operating the High Five E-Nail. Avoid burns by never touching the heating coil or heat shield during or immediately after use – these components reach extremely high temperatures. Ensure proper ventilation to prevent potential hazards.
Handle coils with care and follow maintenance guidelines. Never operate the E-Nail without reading this manual thoroughly to understand all safety instructions and warnings.
Avoiding Burns and Heat Exposure
Extreme caution is vital; the High Five E-Nail’s components become intensely hot. Never touch the heating coil, heat shield, or E-Nail adapter while in use or shortly after. Allow ample cooling time before handling.
Avoid direct contact with heated surfaces. Not reading the manual before use significantly increases burn risk. Always use appropriate tools for adjustments and maintenance to prevent accidental contact.
Proper Ventilation Guidelines
Ensure adequate ventilation during E-Nail operation. While the High Five E-Nail doesn’t produce excessive fumes, operating in a well-ventilated area minimizes potential irritants.
Avoid enclosed spaces with limited airflow. Consider using a fan to circulate air, especially during prolonged sessions. Proper ventilation contributes to a more comfortable and safer experience, reducing the concentration of any airborne particles.
Coil Handling and Maintenance
Handle the heating coil with care; it gets extremely hot! Never touch a hot coil directly – always allow it to cool completely before handling. Regular cleaning extends coil lifespan. Remove residue with isopropyl alcohol and a cotton swab after each use.
Avoid dropping or bending the coil, as this can damage it. Inspect for damage before each session; replace if necessary for optimal performance and safety.
Setting Up Your High Five E-Nail
Begin by connecting the 6ft power cord to the E-Nail controller and a grounded outlet. Carefully attach the heating coil to the enail adapter, ensuring a secure fit. Install the universal joint and heat shield, tightening gently.
Double-check all connections before powering on. Ensure proper alignment for efficient heat transfer and safe operation. Refer to the included diagrams for visual guidance during setup.
Connecting the Power Cord
First, locate the power port on the LCD E-Nail controller. Insert the provided 6ft power cord firmly into this port. Then, plug the other end into a grounded electrical outlet, ensuring it’s properly earthed for safety.
Verify the connection is secure to prevent interruptions during use. The unit is CE & UL certified, featuring grounded and fuse-protected components. Do not use damaged cords.
Attaching the Heating Coil
Carefully screw the heating coil onto the universal joint of the E-Nail. Ensure a snug, but not overly tight, connection to avoid damage. The coil should be centered for even heating.
Avoid touching the coil directly with bare hands, as it will become extremely hot during operation. Always allow the coil to cool completely before handling or replacing it. Due to environmental conditions, temperature may vary.
Universal Joint and Heat Shield Installation
Securely attach the universal joint to the E-Nail body, ensuring free rotation for optimal positioning. Next, carefully slide the heat shield over the coil and universal joint. The heat shield minimizes heat transfer and protects surrounding surfaces.
Proper installation is crucial for safe operation. Confirm the heat shield is firmly in place before powering on the device. Avoid obstructing airflow around the heat shield during use.
Operating Instructions
To begin, connect the power cord and attach the heating coil as described previously. Power on the E-Nail using the controller. Utilize the temperature control settings to select your desired heat level, remembering the high temp range is 550-600°F (do not exceed 900°F).
Allow sufficient warm-up time before use. Always exercise caution as the E-Nail and coil become extremely hot during operation. Never touch heated components without proper protection.
Powering On and Off
To power on the High Five E-Nail, ensure the power cord is securely connected. Press the power button on the LCD controller; the display will illuminate, indicating the unit is active. To power off, simply press the power button again.
Always allow the coil to cool completely before handling or storing the device. Disconnecting the power cord is recommended for extended periods of non-use, enhancing safety and longevity.
Temperature Control Settings
The High Five E-Nail offers precise temperature control via the LCD controller. The High Temp Range is 550-600°F (750°F), do not exceed 900°F. Use the buttons to adjust the temperature in increments.
Start with a lower temperature and gradually increase it to find your optimal setting. Consistent temperatures ensure even heating and a superior dabbing experience. Monitor the display for accurate readings.
High Temp Range (550-600°F / 750°F — Do Not Exceed 900°F)
The High Five E-Nail’s optimal temperature range is 550-600°F (750°F). Crucially, never exceed 900°F, as this can damage the coil and potentially pose a safety hazard. Begin with lower settings and incrementally increase to achieve desired vaporization.
Environmental conditions can affect temperature, so adjust accordingly. Consistent monitoring ensures efficient and flavorful dabs. Prioritize safety and coil longevity by adhering to these temperature guidelines.
Understanding the LCD Controller
The LCD controller is your central hub for precise temperature management. Display indicators clearly show the set and actual temperatures. Button functions allow for easy adjustments, powering the unit on/off, and navigating settings. Familiarize yourself with each button’s purpose for seamless operation.
Temperature adjustment is intuitive, enabling customized dabbing experiences. The controller ensures consistent heat and optimal vaporization, maximizing flavor and potency.
Display Indicators
The LCD screen presents crucial information at a glance. It prominently displays the set temperature, allowing you to monitor your desired heat level. Simultaneously, the actual temperature is shown, indicating the coil’s current status. These indicators ensure precise control and prevent overheating.
Additional symbols may appear, signaling power status or potential error codes, prompting immediate attention for safe and efficient operation.
Button Functions
The controller features intuitive buttons for seamless operation. The power button initiates or terminates the heating process. Temperature adjustment buttons, typically marked with “+” and “-“, allow precise setting of your desired heat. A set button confirms temperature selections.
Understanding these functions is vital for optimal control. Refer to the manual for specific button combinations and advanced features, ensuring a tailored vaping experience.
Temperature Adjustment

Precise temperature control is crucial for optimal dabbing. Utilize the “+” and “-” buttons on the LCD controller to navigate to your preferred heat setting. The High Five E-Nail operates within a high temp range of 550-600°F (750°F), but never exceed 900°F.
Adjustments should be made incrementally, allowing the coil to stabilize before each dab. Refer to the manual for recommended temperatures based on concentrate consistency.
Coil Care and Maintenance
Regular coil maintenance ensures longevity and optimal performance. Cleaning the heating coil after each use prevents buildup and maintains flavor purity; Replace the coil when performance diminishes or damage is detected. Proper handling extends its lifespan.
Avoid harsh chemicals; isopropyl alcohol is recommended for cleaning. Store coils properly when not in use to prevent oxidation and damage, following the user manual’s guidance.
Cleaning the Heating Coil
To clean the heating coil, ensure the E-Nail is completely cool and disconnected from power. Gently wipe the coil with a cotton swab dipped in isopropyl alcohol. Avoid excessive force to prevent damage. Remove any residue buildup carefully, ensuring no alcohol remains before reuse.
Regular cleaning maintains optimal performance and prevents flavor contamination, extending the coil’s lifespan as detailed in the manual.
Replacing the Heating Coil
To replace the heating coil, first, ensure the E-Nail is completely cooled and disconnected. Carefully unscrew the old coil from the heating element. Then, screw in a new, compatible High Five coil, ensuring a secure fit. Do not overtighten.
Refer to the user manual for compatible coil types. Proper replacement ensures consistent heating and optimal performance, as detailed within the provided documentation.
Extending Coil Lifespan
To maximize coil life, regularly clean the heating element after each use, removing any residue. Avoid exceeding the recommended temperature range (below 900°F). Proper cleaning prevents buildup and ensures efficient heating.
Handle coils with care to prevent damage. Refer to the user manual for detailed cleaning instructions and coil care tips. Consistent maintenance, as outlined, will significantly prolong the lifespan of your High Five E-Nail coil.
Troubleshooting Common Issues
If no power reaches the E-Nail, check the power cord connection and ensure the outlet is functioning. Temperature issues? Verify settings and allow sufficient time to reach the set point. Error codes on the LCD display indicate specific problems; consult the user manual for interpretations.
Not reading the manual before use is a common issue. Always refer to the guide for solutions and safe operation. Avoid using damaged coils or cords.
No Power to the E-Nail
If the E-Nail fails to power on, first confirm the power cord is securely connected to both the controller and a working electrical outlet. Test the outlet with another device to rule out an outlet issue. Inspect the power cord for any visible damage, such as cuts or fraying.
Ensure the LCD controller’s power button is fully engaged. Refer to the user manual for detailed diagrams.
Temperature Not Reaching Set Point
If the E-Nail isn’t reaching the desired temperature, verify the heating coil is correctly attached to the controller and the universal joint. Ensure the coil isn’t damaged or exhibiting signs of wear. Environmental conditions can affect performance; adjust accordingly.
Confirm the set temperature is within the High Five E-Nail’s operational range (550-900°F). Refer to the user manual for detailed troubleshooting steps.

Error Codes on the LCD Display
The LCD controller displays error codes indicating specific issues. Consult the user manual’s troubleshooting section for a comprehensive list and their meanings. Common errors may relate to coil connectivity, temperature sensor malfunctions, or controller failures;
Record the error code and contact customer support if the issue persists after attempting recommended solutions. Ignoring error codes can lead to further damage or unsafe operation of your High Five E-Nail.
CE and UL Certification Details
The High Five E-Nail incorporates CE and UL certified components, ensuring adherence to stringent safety standards. These certifications confirm the device is grounded and fuse protected, minimizing electrical hazards. This commitment to quality guarantees a reliable and safe user experience.
These certifications demonstrate the product’s compliance with relevant regulations, offering peace of mind. Always verify the presence of these markings on the device and packaging for authenticity.
Grounded and Fuse Protected Components
The High Five E-Nail is designed with grounded components, directing errant electrical currents safely away from the user. Integrated fuses provide an additional layer of protection, interrupting the circuit in case of power surges or malfunctions. This dual-protection system significantly reduces the risk of electrical shock and damage to the device.
Regularly inspect the power cord for damage, and never operate the E-Nail with a compromised cord.
Realtek High Definition Audio Considerations

While seemingly unrelated, some users report conflicts between the High Five E-Nail’s operation and Realtek High Definition Audio drivers. This can manifest as audio distortions or installation failures. The issue often stems from driver incompatibility or conflicts with other audio devices. Ensure your Realtek drivers are up-to-date, or consider a clean reinstall if problems persist.
Troubleshooting steps are detailed later in this manual.
Potential Conflicts with Audio Drivers

Occasionally, the High Five E-Nail’s power supply or controller may interfere with Realtek High Definition Audio drivers, leading to installation failures or distorted sound. This is rare, but documented. Users have found success by temporarily disabling other audio devices during driver installation. If conflicts arise, uninstalling and reinstalling the audio drivers, as detailed later, often resolves the issue.
Ensure Windows Update is current.
AMD High Definition Audio Device Integration
The AMD High Definition Audio Device, integrated within AMD graphics cards, can sometimes present compatibility challenges. While generally stable, conflicts may occur during driver installations, potentially impacting audio functionality. Ensuring your AMD graphics drivers are up-to-date is crucial. If issues persist, temporarily disabling the AMD audio device within Device Manager during Realtek driver installation can mitigate potential conflicts, restoring proper audio operation.
Compatibility and Driver Updates
Maintaining compatibility requires regular driver updates for both the AMD High Definition Audio Device and your operating system. Outdated drivers can lead to instability or functionality issues. Check the AMD support website frequently for the latest driver releases tailored to your specific graphics card model and Windows version. Consistent updates ensure optimal performance and minimize potential conflicts with other audio components.
Addressing “Realtek High Definition Audio Installation Failed” Errors

To resolve Realtek High Definition Audio installation failures, begin by completely uninstalling existing audio devices through the Control Panel. Then, reopen Device Manager and scan for hardware changes. Alternatively, manually download and reinstall the latest drivers from the Realtek website. Ensure a stable internet connection during the process, and restart your computer after installation completes to finalize the changes.
Uninstalling and Reinstalling Audio Drivers
To begin, access the Control Panel and uninstall the Realtek High Definition Audio driver. Next, open Device Manager, expand “Sound, video and game controllers,” and remove the audio device. Restart your computer, allowing Windows to automatically reinstall a basic driver. Afterwards, download the newest driver from Realtek’s official website and install it, ensuring a successful and stable audio configuration.
Windows Update and NVIDIA High Definition Audio
Ensure your system receives regular Windows Updates, as these often include crucial driver patches for NVIDIA High Definition Audio. These updates address compatibility issues with the kernel and USB interfaces, potentially resolving sound problems. Regularly checking for updates guarantees the most stable performance and minimizes conflicts. This proactive approach helps maintain optimal audio functionality alongside your High Five E-Nail setup.
Ensuring Driver Compatibility
Maintaining driver compatibility is crucial for seamless audio operation alongside your High Five E-Nail experience. Regularly check NVIDIA’s website for the latest High Definition Audio drivers specifically tailored to your graphics card and operating system. Outdated or incompatible drivers can cause conflicts, leading to sound issues. Prioritize driver updates to guarantee optimal performance and prevent potential disruptions during use.
High Definition Audio as a System Default
High Definition Audio functions as the standard system audio driver, utilized by both integrated and dedicated sound cards. It’s automatically loaded even without specific drivers installed, ensuring basic audio functionality. However, for optimal performance with your High Five E-Nail and other audio devices, installing dedicated drivers is recommended. This guarantees full feature support and prevents potential conflicts, enhancing your overall audio experience.
Understanding System Audio Drivers
System audio drivers are essential software enabling communication between your operating system and audio hardware. High Definition Audio (HDA) is a common default driver, providing basic functionality. However, dedicated drivers from manufacturers like Realtek or NVIDIA offer enhanced features and compatibility. Proper driver installation ensures optimal sound quality and resolves potential conflicts, crucial for a seamless experience with your High Five E-Nail’s associated audio components, if any.
Virtual Mood: “It is (high) time that…”
The phrase “It is (high) time that…” expresses a sense of urgency or overdue action, employing a virtual mood. Grammatically, it requires a past subjunctive, often using the past tense or “should” + base verb. For example, “It is high time that you reviewed the E-Nail manual!” This construction emphasizes the importance of promptly understanding the device for safe and effective operation, ensuring a positive user experience.
Grammatical Structure and Usage
The construction “It is (high) time that…” functions as a fixed expression demanding immediate attention. It’s followed by a subordinate clause in the past subjunctive mood. While the past tense is common (“It is time he read the manual”), using “should” + verb is also correct, though “should” isn’t optional. This structure conveys a sense of delayed action, urging prompt engagement with the High Five E-Nail’s user guide for safe operation.
PDF Manual Availability and Download
The official High Five E-Nail user manual is readily accessible in PDF format. This comprehensive document details every aspect of your device, from initial setup to advanced troubleshooting. Users can locate the manual through the manufacturer’s website or by contacting customer support directly. Downloading the PDF ensures convenient offline access to vital information regarding safe operation and maintenance of your E-Nail.
Locating the Official User Manual
To find the High Five E-Nail’s official user manual, begin by visiting the manufacturer’s website. Navigate to the support or FAQ section, where downloadable PDFs are typically hosted. Alternatively, contacting customer support via email or phone will provide direct access to the manual. Ensure you download the latest version for accurate instructions and safety guidelines. Having the manual readily available enhances your E-Nail experience.
Warranty Information
The High Five E-Nail warranty covers manufacturing defects for a specified period from the purchase date. This coverage includes the controller and power cord, but may not extend to the heating coil due to its consumable nature. To initiate a warranty claim, contact customer support with proof of purchase. Damage from misuse or improper handling voids the warranty. Review the full warranty details within the user manual.
Coverage Details
The High Five E-Nail warranty safeguards against defects in materials and workmanship. Coverage typically lasts for one year from the original purchase date, protecting the controller and power cord. The heating coil is often excluded due to normal wear and tear. Accidental damage, misuse, or unauthorized modifications are not covered. Retain your proof of purchase for warranty service requests. Full terms are detailed in the included manual.
Contacting Customer Support
For assistance with your High Five E-Nail, reach out to their dedicated support team. Check the official website for a comprehensive FAQ section addressing common issues. Email support is generally available for detailed inquiries, and response times vary. Some retailers may also offer direct support. Ensure you have your purchase details ready when contacting them for faster assistance and warranty claims processing.